The Contact Account screen may be accessed by clicking Contacts on the Files Menu screen.
Depending on your Property's configuration, you may have the Files Menu command available from the Quick Menu.
The Files Menu screen has two sections, Files List 1 and Files List 2.
Select Contacts from the Files List 2 section.
Alternatively, IF your Property is using it, you can also access the Contact Account screen through the Sales and Catering section of the Skyware system.
Note: If your Property does not currently have our Sales and Catering Module and you are interested in adding it, please contact us at Sales@SkywareSystems.com.
The Sales and Catering Menu may be reached either directly from the Quick Menu, or by using the Full Menu and selecting Sales and Catering => from the Other section.
1. Select Sales and Catering => from the Quick Menu (left side of screen).
OR
2. Select Sales and Catering => from the Other section of the Full Menu,
Click the icon on the left for the Full menu.
![]()
This will display the Full menu in a tabular form, with four sections, Registration, Status, Cashier and Other.
From the Other Section, select Sales and Catering =>.
The Sales and Catering Menu has four sections, Selling Tools, Sales, Groups and Catering Reports.
Contacts is in the Selling Tools section.
When accessed the Contact Account screen will open, with a list of configured Contacts for your Property appearing on the left, and the details about a selected Contact appearing in the main area of the screen. Any changes made on the right, once saved, will be updated in the listings to the left.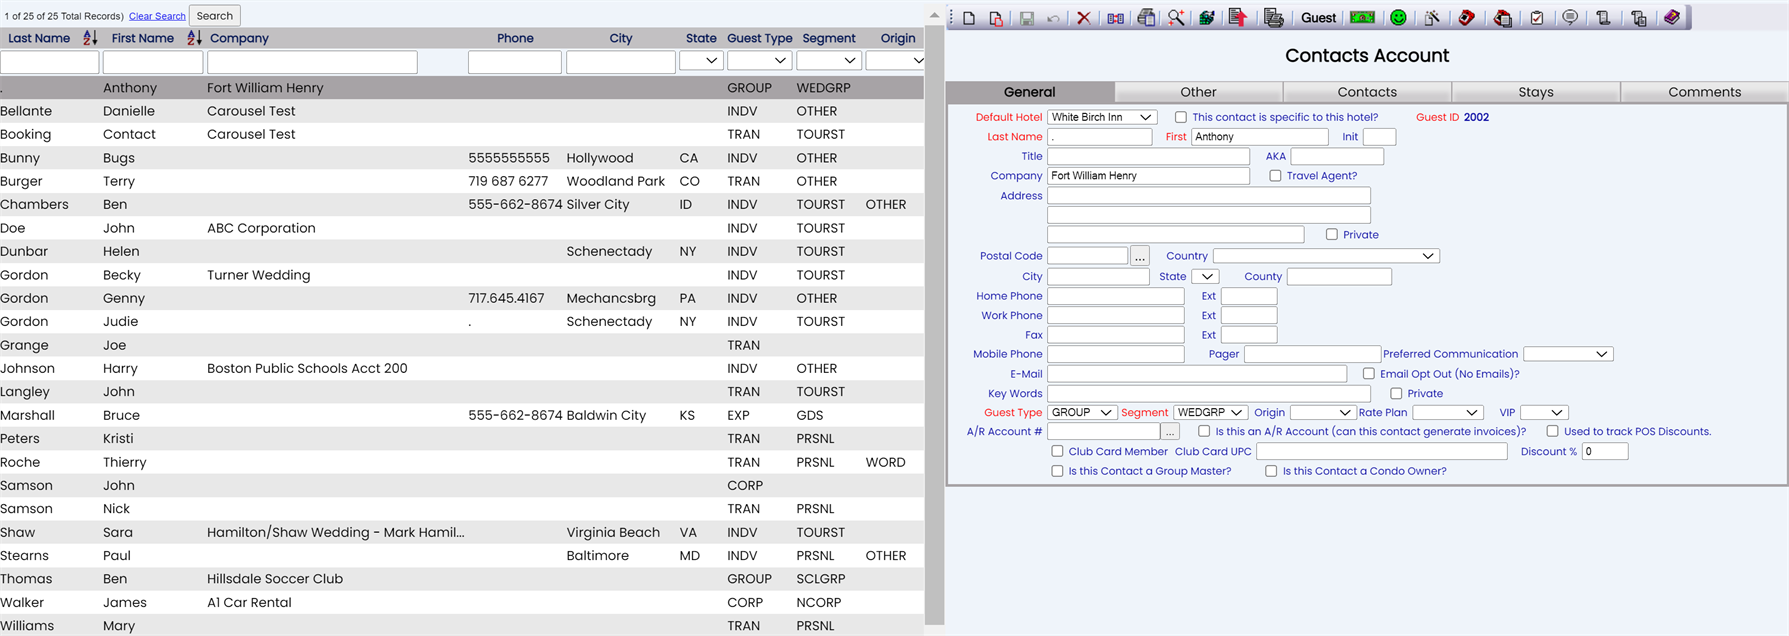
Last Name: The last name of the Contact.
First Name: The first name of the Contact.
Company: The name of the Company OR Group that this Contact is associated with.
There are several other categories listed on the left that the Contacts may be organized by; these entries may or may not be blank for your Contacts depending on the entered information. Only the categories containing required information must have an entry in the field, and required information is set by your Property. Skyware Systems requires ONLY the Default Hotel for this Contact, Contact Name, Guest Type and Segment fields on the left to be completed by you.
Phone: Telephone number provided for the Contact.
City: City the Contact is located.
State: State the Contact is located in.
Guest Type: A marketing code that is used to help broadly define the Contact.
Segment: A marketing code that is used to help define the Contact, alongside Guest Type.
Origin: A marketing code that may be used to help define the Contact, alongside Guest Type and Segment.
Keywords: Any keywords associated with this Contact.
IATA#: International Air Travel Association's assigned Travel Agent Number associated with the Contact.
A/R#: Accounts Receivable Account Number.
E-mail: E-mail address provided for the Contact.
Club: Is the Contact a member of your Property's club (and may therefore be eligible for discounts?)
Note: This option is yes or no and will therefore always have an entry in the field.
ID: The Contact's Skyware Systems' assigned ID. This field is automatically assigned when the Contact is configured.
Note: The information in these fields may all be entered and edited on the General tab (the tab that appears by default) in the main section of the Contact account screen.
Selecting any Contact on the left will display the details on the right.
Your options include the following:
Generate a new entry:
Click the New ![]() button from the toolbar to add a new Contact.
button from the toolbar to add a new Contact.
Complete the fields described below.
OR:
Select an existing Contact from the list on the left, and click the Replicate ![]() button from the toolbar. Then change the field information as described below.
button from the toolbar. Then change the field information as described below.
Edit the current selection:
Change the field information described below.
The Contact Account screen has several tabs on which information may be entered. Use the tabs to access different information about the Contact account. These tabs include, General , Other, Contacts, Stays, and Comments.
However ONLY the General tab contains REQUIRED fields for generating a new Contact entry.
This tab contains the REQUIRED information for creating a new Contact Account in your Skyware Systems
Default Hotel: If you have more than one Property with Skyware Systems, you MUST select which Property to associate this Contact with primarily. Choose one from the available options.
This guest is specific to this hotel?: This check box may be checked or unchecked. If it is checked, the Contact will ONLY be associated with the Default Property chosen, no matter how many Properties you have with Skyware Systems.
Guest ID: The Contact's Skyware Systems' assigned ID. When the Contact Record is first generated this will be automatically assigned bySkyware Systems.
If your Contact already has an account in your Skyware system, when the Contact Group account is saved for the first time, the ID associated with the guest or contact account will be used. If not, a new one will be generated. Be sure that the names used in the required fields below match the names on the existing account to enable Skyware to find the correct record.
Last Name: Enter the last name of the contact here.
This field is required.
First Name: Enter the first name of the contact here.
This field is required.
Company: This is the name of the Company or Group the Contact will be associated with. Enter the desired name; this should be the name used in the Company or Group Account record.
Address: Enter the address of the Contact if known.
Private Address?: This check box may be checked or unchecked. If the address provided with the Contact is a private individual, you should check this box. If it is the public address of a company, you may leave it unchecked.
Postal code: You may enter the postal/zip code associated with the Contact address here. If it is not known, you can use the search button next to the field to look it up; this will open a pop up window listing all known codes where you can search by Postal Code, City, State, Country, State Name or County, and select one.
Country: This is a drop-down menu of all available countries for you to select from for the address.
Home Phone: This field is for entering the home phone number, if one is supplied, of the Contact.
Ext: This space allows you to include an extension for the home phone number supplied.
Work Phone: This field is for entering the work phone number, if one is supplied, of the Contact.
Ext: This space allows you to include an extension for the work phone number supplied.
Fax: This field is for entering the Fax number, if one is supplied, of the Contact.
Ext: This space allows you to include an extension for the Fax number supplied.
Mobile Phone: This field is for entering the Mobile phone number, if one is supplied, of the Contact.
Pager Number: This field is for entering the Pager number, if one is supplied, of the Contact.
Preferred Communication: This is a drop-down menu of options you can select from. You may choose E-mail, SMS text or Op out of All. No selection here will automatically default to E-mail as the preferred communication choice.
E-mail: Enter the E-mail address to be used for the Contact here.
Email Opt Out (No Emails)?: This check box may be checked or unchecked. If checked, the contact for the account has opted out of having any e-mail contact.
Keywords: Enter any keywords to be associated with the Contact account here.
Private: This box may be checked or unchecked. Checking this box will make any E-mail communication private.
Guest Type: This is a marketing code that is used to help broadly define the Contact. Choose one from the options available in the drop-down menu. These have been configured specific to your Property.
This field is required.
Segment: This is a marketing code that is used alongside Guest Type, to help define the Contact. Choose one from the options available in the drop-down menu. These have been configured specific to your Property.
This field is required.
Origin: This is also a marketing code that may be used to help further define the Contact, alongside Guest Type and Segment. Choose one from the options available in the drop-down menu. These have been configured specific to your Property.
Rate Plan: You can select a Rate Plan to be associated with this Contact Account from the drop-down menu of your configured available options, or you can leave this field blank to cause the Rate Plan to require selecting any time you create a reservation for this Contact.
VIP: If the Contact is considered a VIP associated with your Property, you should select the relevant code from the drop-down menu of those available. This allows you to categorize your guests as Very Important People (VIP) for reporting purposes
A/R Account #: Accounts Receivable Account Number. If this Contact is using an A/R Account - meaning that the guest or company can be invoiced (billed) for charges - then provide the A/R Account number in the account number field. This number can be alpha or numeric.
If the A/R Account already exists in the system, use the search box to search for and attach the appropriate A/R number. Clicking on the search box will open a pop up window listing A/R Accounts for you to select from.
Is this an A/R Account (can this contact generate invoices)?: This check box may be checked or unchecked. If this Contact will be using an account that has been set up for direct billing at your Property, this box must be checked.
Note: Checking this box will label this account as Contact and A/R Account, rather than simply a Contact Account.
Used to track POS Discounts: This is used to track POS Discounts given to the Contact. This check box may be checked or unchecked. If checked, POS discounts will be removed from the POS check pre-tax and the taxes will be adjusted automatically for you.
Sales Manager: This is the default Sales Manager to be associated with this Contact. Select one of the options from the drop-down menu or leave blank.
Catering Manager: This is the default Catering Manager to be associated with this Contact. Select one of the options from the drop-down menu or leave blank.
Conference Services Manager: This is the default Conference Services Manager to be associated with this Contact. Select one of the options from the drop-down menu or leave blank.
Club Card Member: This box may be checked or unchecked. by default it is unchecked. If your Property uses a club card system, and this Contact is associated with it, you should check this box.
Club Card UPC: If you have checked the Club Card Member box, you should enter the unique UPC associated with that membership here.
Discount %: This is the % discount given to the Contact account for being a Club Card Member. Enter the number here, as a whole percentage.
Booking Category: If there is a Booking Category to be associated with this Contact, select it from the drop-down menu of available options here. Otherwise you may leave this field blank.
Is this Contact a Group Master?: This box may be checked or unchecked.
Is this Contact a Condo Owner?: This box may be checked or unchecked. By default it is unchecked. This box should be checked if the Contact account details entered are for a Condo owner.
Note: This General tab contains a large amount of information for the Contact record, but most of it can be added to or edited at any time. Only the red fields are required to initially generate the Contact record.
To create a Contact account you must use the save button after entering at minimum the required fields information. Only after saving will a new Contact account be generated.
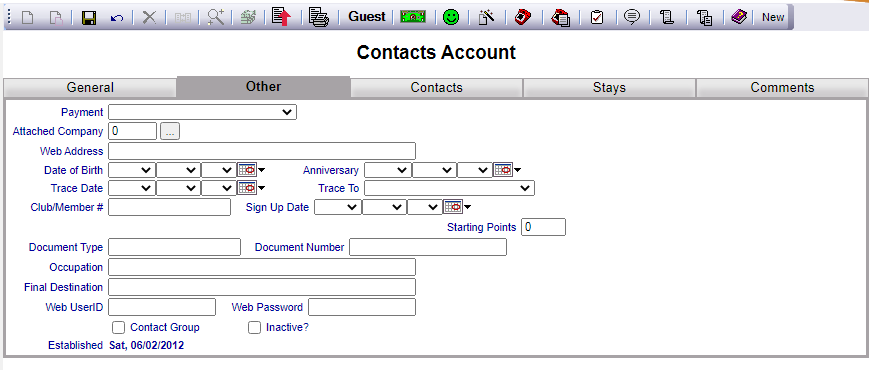
This tab contains several other areas of information for the Contact account. NO information on this tab is essential for creating the Contact, but may prove useful to have if you can complete it. This information will carry over to each stay but can be changed at the stay level.
Note: SOME fields available may not be relevant to a Group booking.
Attached Company: Enter the Company name associated with this account.
Web Address: Enter the Company email address and web site address. Select the private check box to indicate that the email address should remain private.
Date of Birth: The Date of Birth associated with the Contact.
Anniversary: A special Date associated with this Contact.
Trace Date: Date you want to be reminded that the Contact exists in the system through your personal trace calendar for sales and marketing
Trace to: The manager or other staff member the trace should appear for.
Club Member #: If your Property uses this, AND the Contact is a member, enter the number here.
Sign Up Date: When the Contact signed up to your Club membership.
Starting Points: Points earned in the Club when membership established.
Document Type: Do you have a document you wish to have associated with this Contact? If so, enter the type here. (For example, this may be a Passport or a Driver's license).
Document Number: Do you have a document you wish to have associated with this Contact? If so, enter the identifying number here.
Occupation: You may enter the Contact's/Company's occupation here.
Final Destination: This is a text field that can be drawn upon to add information to a custom document for your Property. For example, a travel destination, such as SeaTac, could be entered into the Final Destination field.
Web User ID: Used if a reservation has been made online.
Web Password: If the reservation has been made online, this may be entered here
Contact Group: This box may be checked or unchecked.
Inactive?: This box may be checked or unchecked. This box can be checked if you no longer wish a Contact to appear in a search in the system.
Established: The date the Contact Account was originally established according to your Skyware Systems internal date.
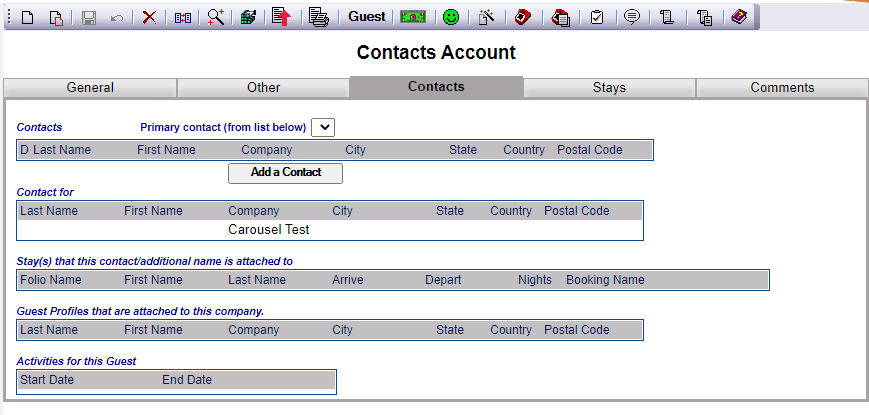
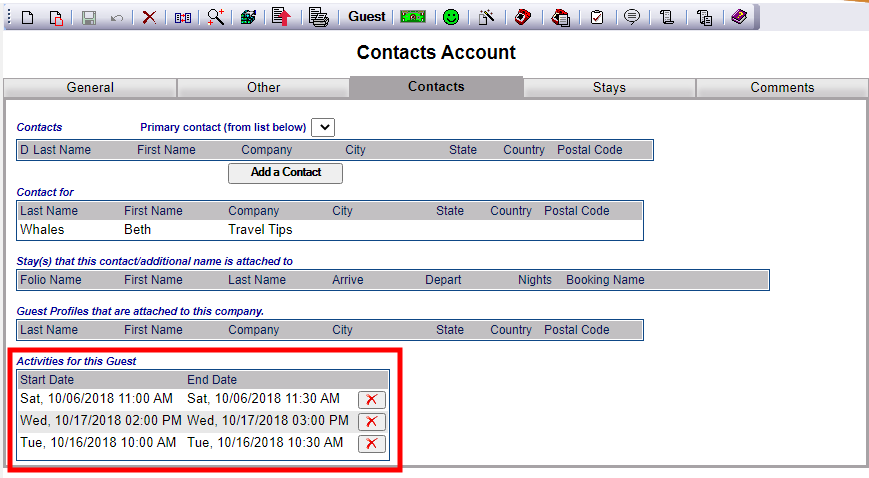
This tab allows you to view the Company or Group that the Contact is associated with. Most of this tab is view only, and extracts information from elsewhere in your Skyware Systems.
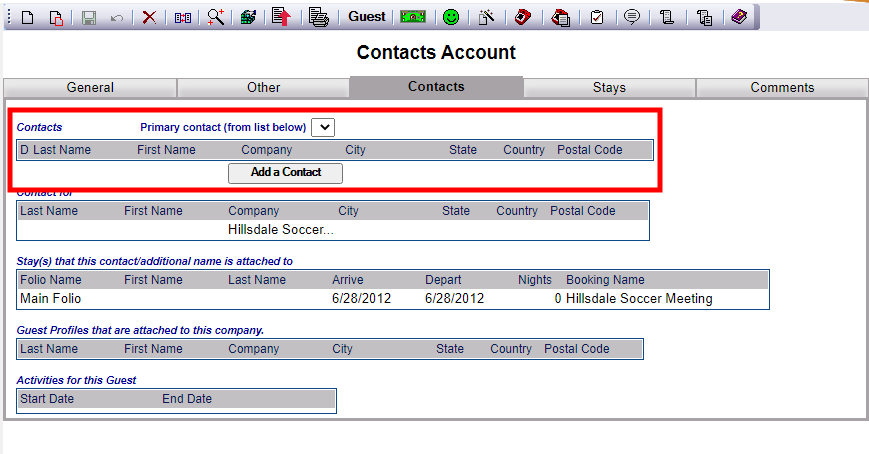
Note: You may attach guests or other contacts that are "associated" with the Contact Information record you are currently viewing. The Contacts section area is typically used when the Information record is attached to a Company; the contact area would show all of the individuals that work for that company. Contact Groups allow you to link several contacts or guests together in order to establish a group or relationship of contacts that exist in the system.
This section may list all CONTACTS currently associated with this Contact (i.e those profiles with records entered as contacts. For the Contacts Account, this section will usually be empty. If you need to add contacts here, it is recommended that you use the Contact Groups command to establish the account as a Contact Group).
Primary contact (from list below): This drop-down menu contains all of the contacts in the Contacts section, and allows you to specify one from the list as the Primary contact for the Company or Group.
Add a Contact: Clicking this button will open the Select/Create Guest to add as a Contact screen.
You may either search for a Guest using the Previous Guest section (top), or create a new Guest record using the New Guest information section (bottom).
Once done, clicking the orange button Finish >> will return you to the Contacts Account screen, still open on the Contacts tab, now with an/another entry in the Contacts section.
Any Contact in this section may be deleted by clicking on the specific delete button to the left of the contact entry. A pop up window asking if you really want to delete this Contact link will appear; if you are sure click OK and the contact will be deleted.
Clicking on a Contact name will open the individual Contacts Account screen.
This section displays the Company that the Contact is associated with.
The Company or Group named in the General tab will appear in this section once the information has been saved
Note: The Contact details shown are those entered in the Company or Group Account record - for example if no address has been entered there, no address will be shown here.
This section displays all of the stay records the Contact has (past present and future), attached to the Company or Group they are the contact for.
Note: If the Contact has no stays associated with the account, this section will be empty. This section will NOT show any stays the contact has that are not associated with their Company or Group (i.e. any personal or individual stays).
Stays cannot be ADDED here, this section is display only. Stays, however CAN be added using the Stays tab.
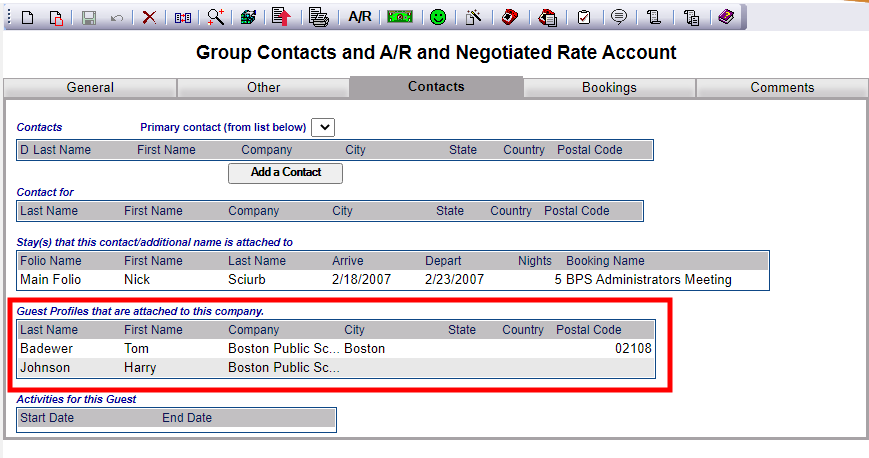
This section show all of the guest records that have been associated with the Company or Group that this Contact is designated for (that you have separate Guest profiles in Skyware Systems for, IF they have been attached to the Company record).
Note: The records must be attached to the Company record before they will appear here, they cannot be ADDED to the record here in the Contact Account screen.
This section shows any activities the Contact/Guest have planned with your Property (for example horseback riding, or a massage).
Note: The activities cannot be ADDED to the record here in the Contact Account screen, this area will only display what has been added elsewhere in your Skyware Systems, BUT they can be removed here (using the red delete button).
This tab shows any Stays (Reservations attached to the Contact as an individual guest), and any Bookings (Reservations the Contact is attached to as a Group Block). Bookings are not assigned to individual Guests but rather represent a Group Block that has been created.
Show Only: You can choose to show only the information on Active, Canceled or Historical reservations in the sections, depending on their Status.
Any entry within a section may be clicked on to go to the Stay Information for that particular reservation.
New Reservation: This button when clicked will open the Reservation screen, allowing you to generate a new (individual) reservation.
New Booking: This button when Clicked will open the Group Block Wizard screen to allow you to generate a new Group Block reservation for the Company or Group this Contact is associated with.
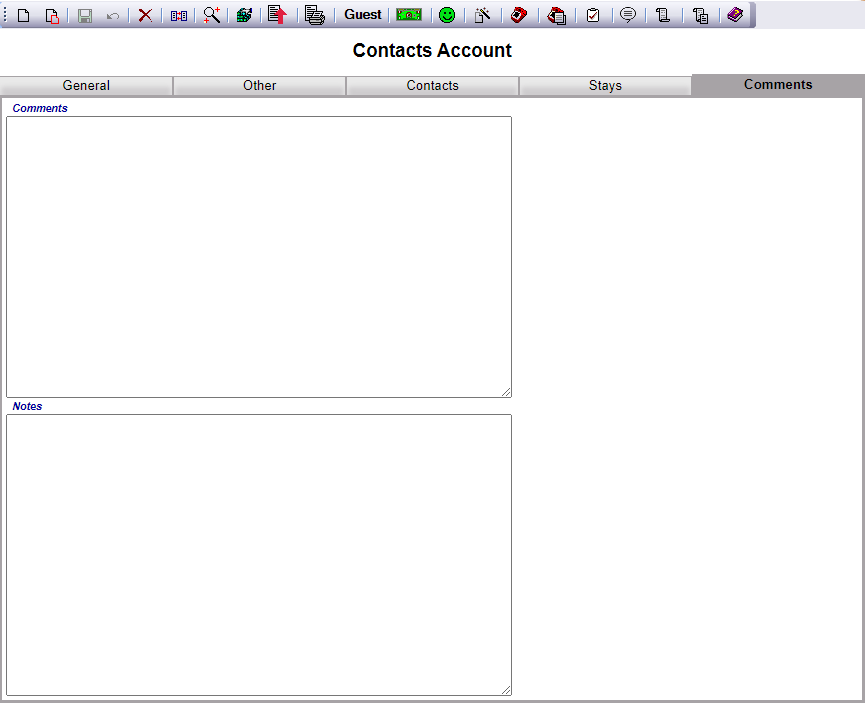
This tab allows you to enter comments and make any notes you wish about the Contact.
Comments: Any information entered into this field will appear as a pop up on the screen when you access the Contact information record.
Notes: Enter any information here that you wish to be associated with this Contact that will not appear every time you access the Contact information record. Any Notes can be used in your Custom documents.
When you are finished adding or editing a Contact record, click the save button (![]() ) in the local tool bar.
) in the local tool bar.


