The Menu Items command on the POS Maintenance menu allows you to add (and remove) menu items from the system.
After an item has been added to the system, you must associate the item with the appropriate restaurant(s), meal periods, categories, preparations, modifiers, and kitchen stations you should already have set up within the system.
The associations made on this tab determine how and where each menu item will appear in the POS interface used by the wait staff. Consider your selections carefully to be sure that menu items appear where they should, and are easy for wait staff to find and select to post to restaurant checks.
NOTE: None of the fields in the POS tab are required, to the extent that the system will let you move on without adding any options. However, you MUST configure at least one restaurant and at least one meal period for the item in order for the item to appear in the POS wait staff interface. This actually allows you to add things like seasonal items into the system but not have them appear in the interface except during times they are available.
This help topic covers the configuration items in the Point of Sale (POS) tab. See Configure Menu Items - General Tab for information on using the General tab of the Menu Items Maintenance screen.
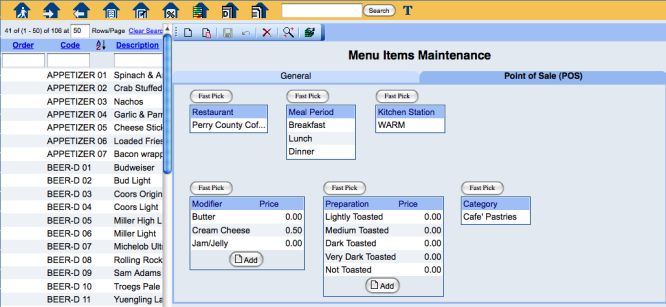
Select Menu Items from the Menu Items Setup section of the Point of Sale (POS) Maintenance menu, then click the Point of Sale (POS) tab to activate it.
The Point of Sale (POS) tab on the Menu Items Maintenance screen has two sides.
The left side of the screen lists all of the entered menu items. Selecting each item allows you to see (and if necessary, edit) the POS options configured for that item via the fields on the right side of the screen. Use the Search fields at the top of the list to find specific items or groups of items.
The right side contains the fields you need to complete in order to associate each menu item with the other aspects of the POS system. These fields are described below.
Each field has a Fast Pick button. The Fast Pick button opens a separate screen listing all configured items for that field and provides checkboxes that allow you to easily select (and deselect) multiple options for the field.
When finished, click Save and Exit to return to the POS tab.
Some fields also have an Add button. This opens the detail screen for the option and allows you to add individual options to menu items using drop down lists.
Clicking on an option from the list in a field also opens the detail screen. This allows you to edit the option if necessary or delete it by clicking the Delete button. For reference, the menu item name appears along with the option in the detail screen.
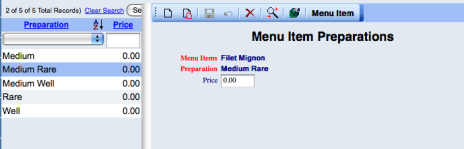
To return to the POS tab from the detail screen click the Menu Item button.
The configurable fields in the POS tab are as follows:
When you are finished, you can select another item from the list, or create a new item using the instructions above.